


 557 / 612

HS40 Carburetors
(General Tuning Procedures)
There are very few moving parts in the HS series
carburetor. This carburetor will not require much servicing, but
there are a few items to be mentioned to assure good
performance season after season.
A.
If the motorcycle is to be stored ir any length of time the
carburetor loat should be drained.
B.
The loat drain plug should be removed periodically and
cleaned of any sediment that may be settled during long
periods of use.
C.
DO NOT drill or modify any part of this carburetor for any
reason ad the result will surely be more problems. Refer to
this Tuning guide to correct any problems that you may have.
D.
If a jet or passage does become plugged, use only carbu-
retor cleaner and compressed air. DO NOT push a drill or
any other object through the jet or passage to clean them.
E.
The fuel level in the carburetor will probably never need
adjusting; however, if a problem has been diagnosed as a
fuel level that is too high or too low, adjustment can be
shown in Figure10.
F.
If the air ilter is dirty and requires servicing, follow these
steps. Typical service is done after about 2,000 miles of use.
Air Filter Service Instructions
A. Pre Cleaning:
Tap the element to dislodge any large
embedded dirt, then gently brush with a soft bristle brush.
B. Pan Cleaning:
Soak or roll element in a large shallow pan
of K&N air ilter cleaner (1/4 the depth of 1 pleat). Remove
immediately and let sit for approximately 10 minutes.
C. Rinse off:
Rinse off the element with low pressure water, tap
water is OK. Always lush from the inside of the ilter out. This
removes the dirt and does not drive into the ilter.
IMPORTANT:
Air dry only.
D. Oiling:
After the ilter has dried always re-oil before using.
Apply K&N air ilter oil with ones pass per pleat. Wait 10
minutes and re-oil any white spots still showing.
IMPORTANT:
Do not use gasoline or cleaning solvent to service the ilter
element as this will damage the ilter.
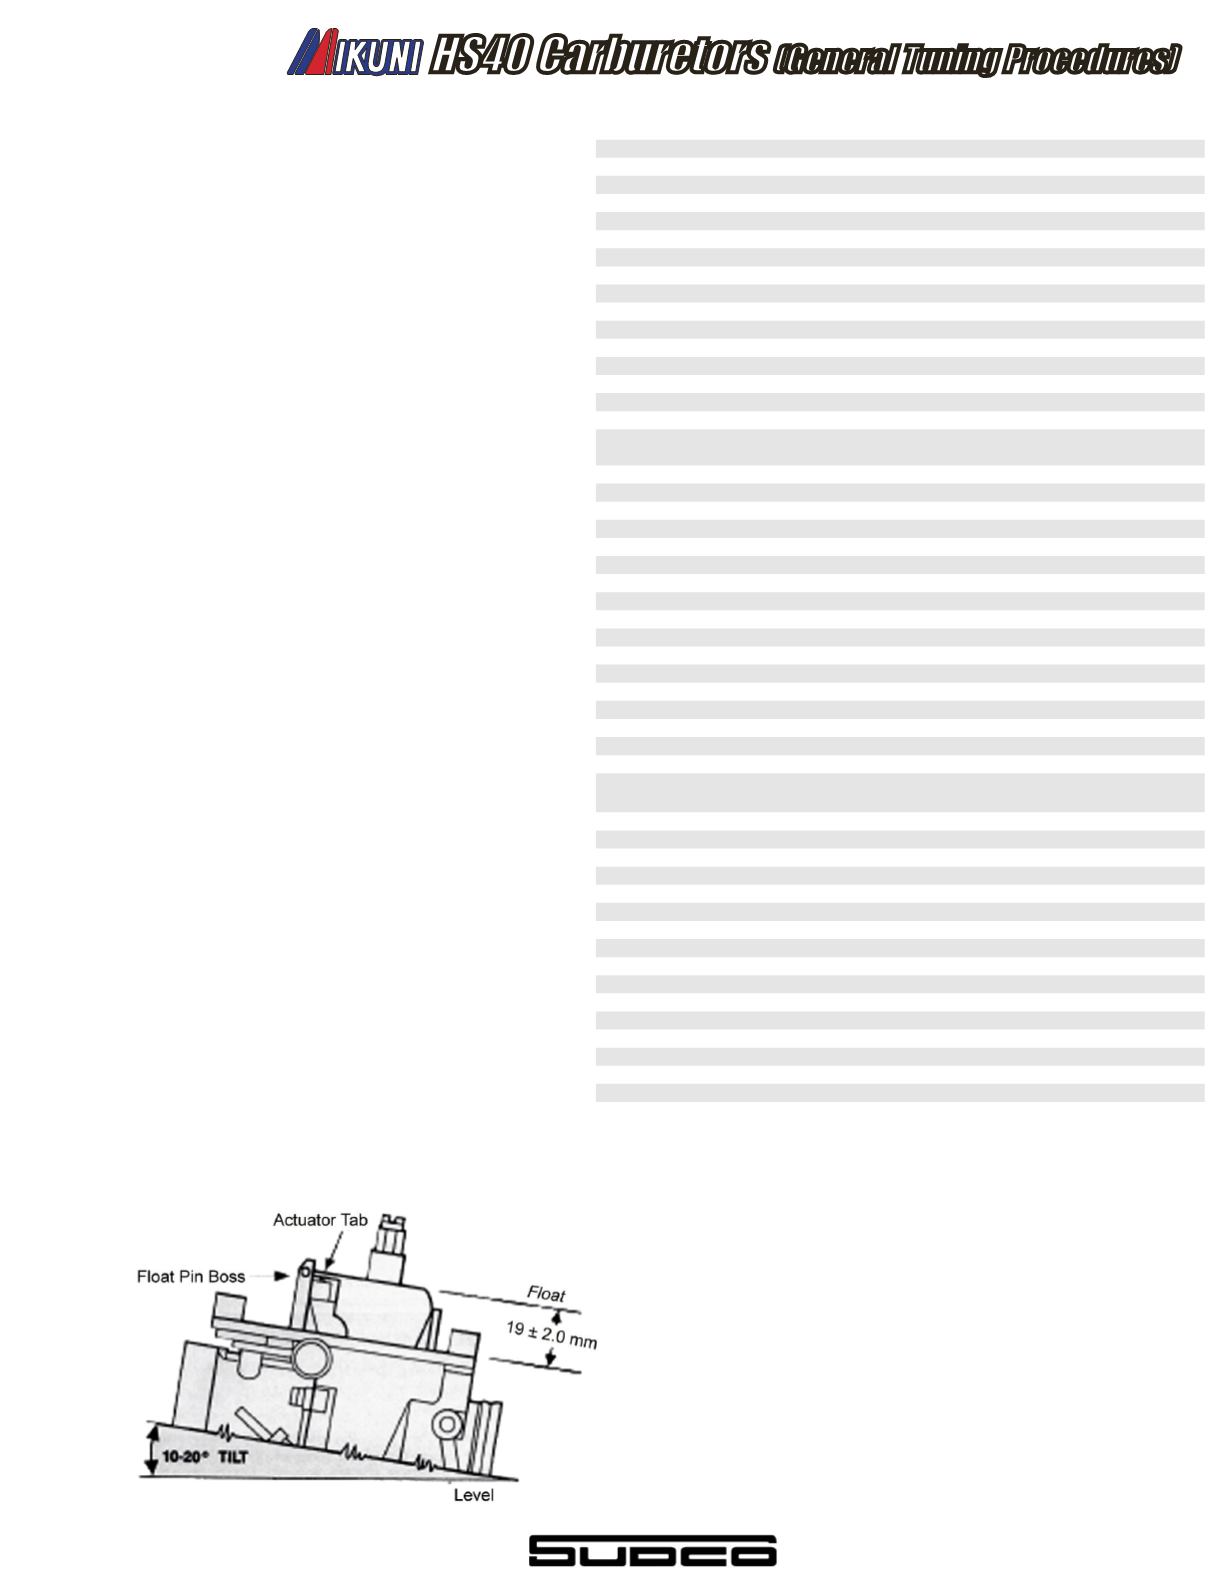
Float Level Adjustments
A.
Invert the carburetor and remove the loat bowl
B.
The loat assembly’s actuator tab should just begin contact
with the Needle Valve assembly when the bottom of the loat is
18mm from the carburetor bottom surface as shown.
C.
If adjustment is required, adjust by bending the actuator tab.
Overlow
1.
Worn needle valve or dirty valve seat.
2
. Improper fuel level in loat bowl.
3
. Damaged loat bowl O-ring gasket.
4.
Loose loat bowl screws.
5.
Pressurized fuel tank.
6.
Broken needle valve O-ring.
Poor Idling
1.
Fuel iller cap not venting.
2.
Idle speed improperly adjusted.
3.
Clogged bypass or outlet.
4
. Clogged pilot jet.
5.
Loose pilot jet.
6.
Air leak in system.
7.
Choke not fully closed.
8.
Crank vent blocked.
Poor Fuel Economy
1.
Filler cap not venting.
2.
Fuel level too high (overlows).
3.
Loose jets.
4.
Choke not fully closed.
5.
Dirty air cleaner.
Poor Acceleration
1.
Clogged accelerator system.
2.
Clogged pilot jet.
3.
Fuel level too low.
Hard Starting
1.
Choke not operating properly.
2.
Generally dirt carburetor.
3.
Air leak in system.
4.
Excessive use of throttle before
starting engine.
Poor Performance on the Road
1.
Fuel iller cap not venting.
2.
Fuel level incorrect.
3.
Main jet loose.
4.
Air leak in system.
5.
Generally dirty carburetor.
6.
Dirty air ilter.
Poor High Speed Performance
1.
Fuel iller cap not venting.
2.
Loose man jet.
3.
Incorrect Fuel level
4.
Strainer in fuel tank dirty.
5.
Clogged main jet.
6.
Fuel level too low
Check for: Remedy:
1.
Replace or clean
2
. Adjust level.
3
. Replace O-ring.
4.
Tighten screws.
5.
Check for proper fuel tank venting.
6.
Replace O-ring.
1.
Replace iller cap
2.
Adjust idle speed.
3.
Clean carburetor.
4
. Clean jet.
5.
Tighten jet.
6.
Tighten manifold or hose clamps.
7.
Adjust cable.
8.
Remove blockage from hose or
passage.
1.
Replace iller cap
2.
Adjust level.
3.
Tighten jets.
4.
Adjust cable.
5.
Clean or replace
1.
Clean.
2.
Clean.
3.
Adjust level.
1.
Adjust cable.
2.
Clean
3.
Tighten manifold or hose clamps.
4.
Do not open throttle before
starting.
1.
Replace iller cap.
2.
Adjust level.
3.
Tighten Jet.
4.
Tighten manifold or hose clamps.
5.
Clean
6.
Clean or replace
1.
Replace iller cap.
2.
Tighten jet.
3.
Adjust level.
4.
Clean.
5.
Clean.
6.
Adjust Level.
Note:
Extreme care should be used whenever removing the loat pin; the
pi is a “press it” into the support bosses. If you must remove the pin for
any reason, use caution to prevent breakage of the support bosses.
549